
If you’ve ever struggled with soil that dries out too fast, stays soggy, or simply refuses to cooperate with your indoor plants, you’re not alone. I’ve been there too. After years of fighting with regular potting mixes, switching to coco coir completely changed how I grow plants.
It’s one of those materials that looks unimpressive at first glance, but once you understand how to use it correctly, it quietly becomes the most reliable growing medium in your gardening toolkit.
This guide covers everything you need to know about coco coir from hydrating a compressed brick for the first time, to building the perfect soil mix for your indoor plants, understanding fertilizer needs, and avoiding the most common mistakes beginners make. Let’s dig in.
What Is Coco Coir?
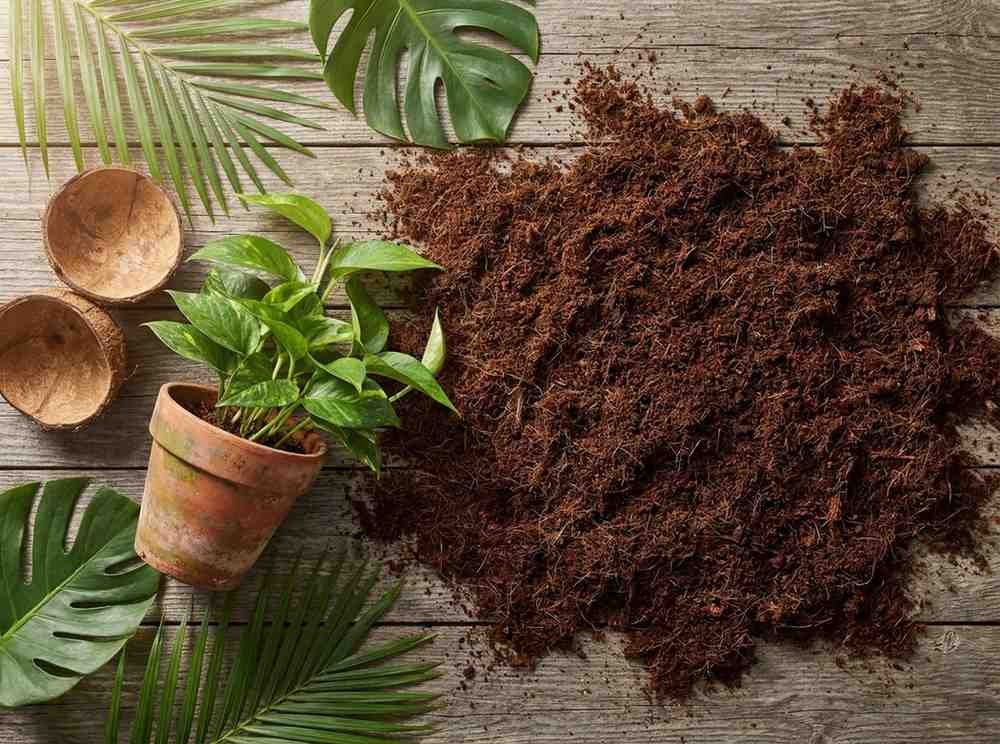
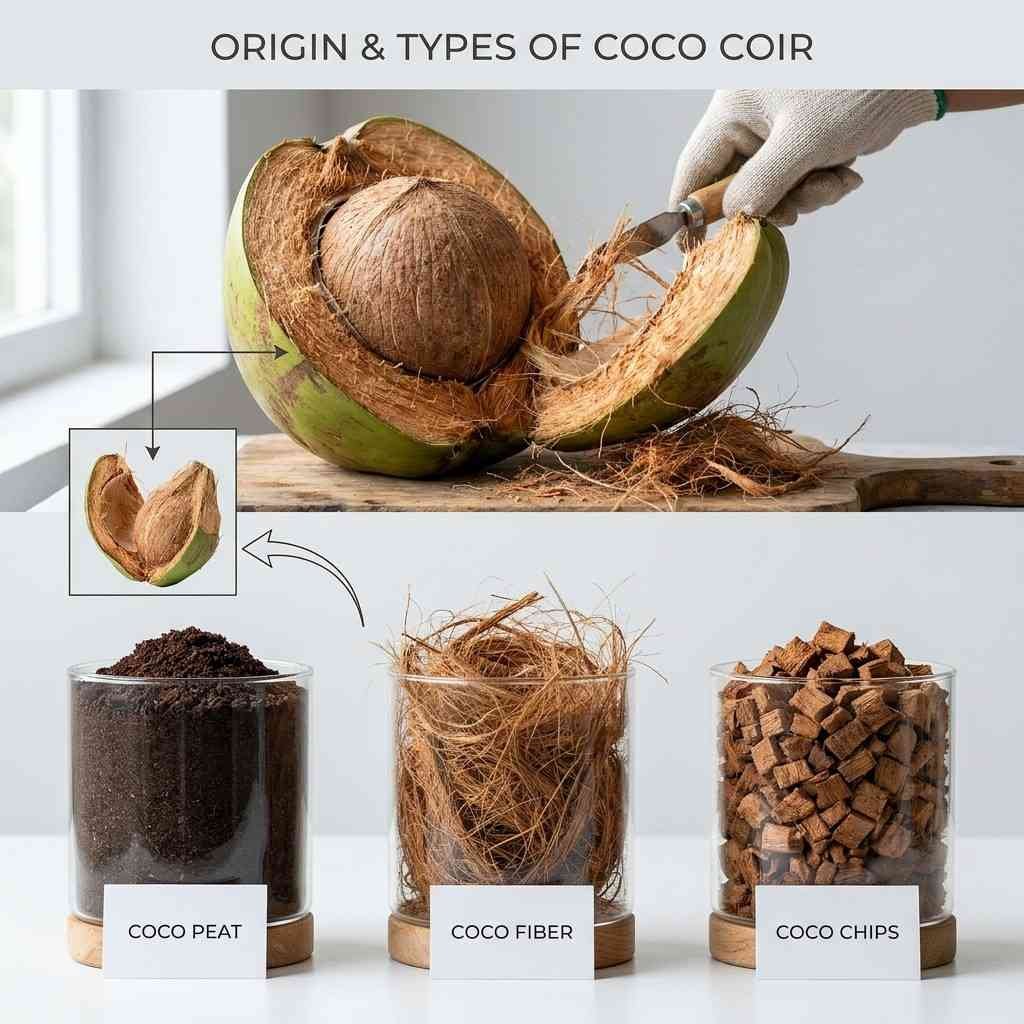
Coco coir is sometimes called coconut coir or coir fiber is a natural growing medium made from the fibrous husks of coconuts. It’s the brown, spongy material found between the outer shell and the hard interior of the coconut.
For decades, this material was considered agricultural waste. Today, it’s one of the most popular soil amendments and growing mediums in both home gardening and commercial horticulture.
It comes in three main forms:
- Coco peat (coir pith): Fine, peat-like texture. Excellent water retention. Best used as a soil amendment.
- Coco fiber: Long, coarse strands. Improves aeration and drainage. Great for mixing with other mediums.
- Coco chips: Small chunky pieces. Ideal for orchids, aroids, and plants that need excellent drainage with some moisture retention.
| Property | Coco Coir | Regular Potting Soil | Peat Moss |
|---|---|---|---|
| pH Level | 5.8 – 6.8 (near neutral) | 6.0 – 7.0 | 3.5 – 4.5 (acidic) |
| Water Retention | High but well-draining | Medium | Very high (can get waterlogged) |
| Aeration | Excellent | Moderate | Low over time |
| Sustainability | Renewable byproduct | Varies | Environmentally depleting |
| Nutrient Content | Very low (needs fertilizer) | Moderate (pre-fertilized) | Very low |
| Reusability | Yes, multiple seasons | Limited | No |
What makes coco coir particularly appealing is its ability to hold moisture without suffocating roots. Unlike peat moss, it doesn’t compact over time, and unlike plain soil, it’s sterile meaning no fungus gnats lurking in the bag before you’ve even potted anything.
“The first time I opened a coco coir block and added water, I was genuinely amazed watching it expand into a full bucket of fluffy growing medium. It felt almost magical and honestly, using it still does.”
How to Use Coco Coir for Plants: Step by Step
Whether you’re growing herbs on a windowsill, propagating succulents, or setting up a hydroponic system, coco coir can fit into almost any growing scenario. The key is using it the right way for your specific plant type. Here’s a clear, practical step-by-step breakdown.
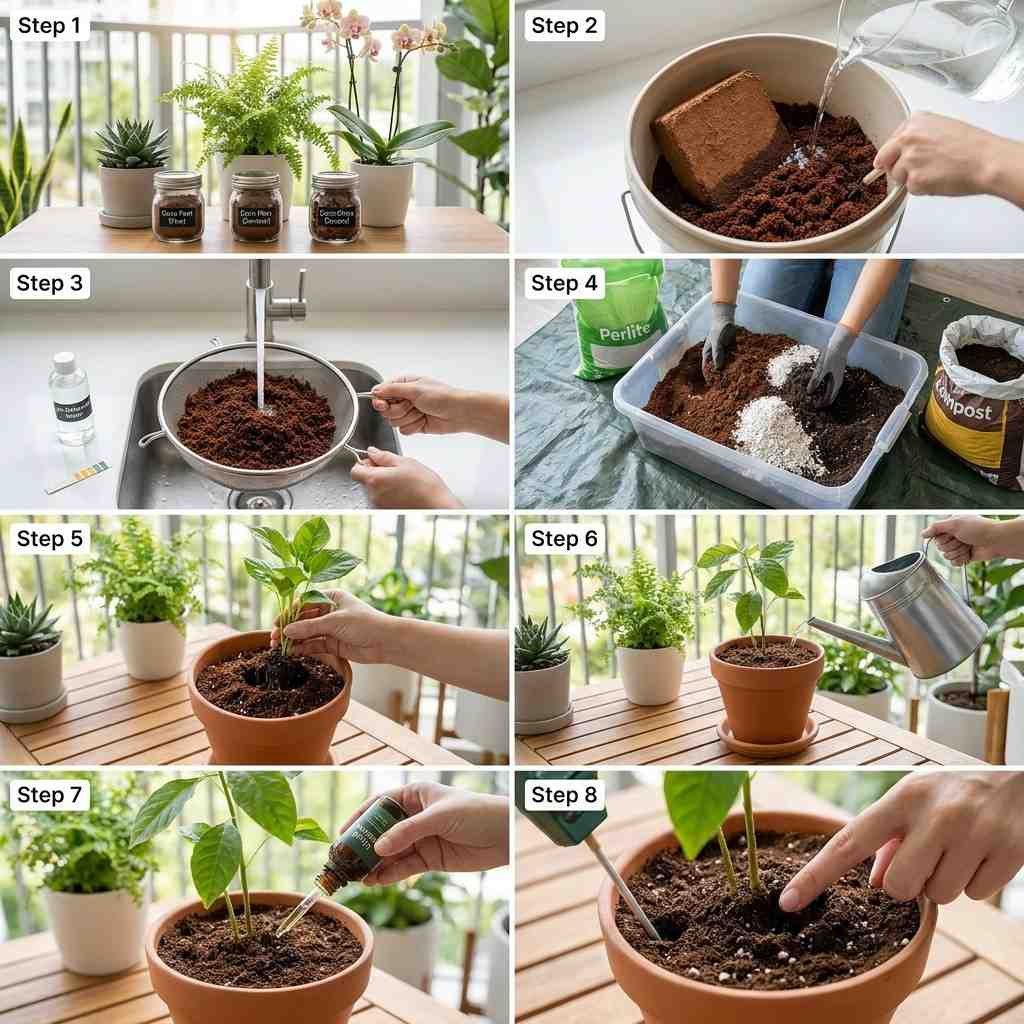
Step 1. Choose the Right Form for Your Plant
Before you do anything, decide which form of coco coir you need. Leafy greens and herbs do best with coco peat mixed into a blend. Orchids and monsteras prefer coco chips for drainage. Propagation cuttings do wonderfully in straight, lightly dampened coco coir fiber. Getting this first step right saves a lot of frustration later.
Step 2. Hydrate Your Coco Coir
Compressed coco coir bricks must be fully hydrated before use. Skipping this step or under-hydrating is one of the most common mistakes beginners make. (See the full hydration guide in the next section.)
Step 3. Flush with pH-Adjusted Water
Before potting, flush your hydrated coco coir with water adjusted to a pH of 5.8–6.2. This removes excess salts (especially sodium, which naturally accumulates in coco coir during processing) and sets you up for better nutrient uptake from day one.
Step 4. Create Your Mix
Straight coco coir alone is too water-retentive for most plants and has zero nutrients. Mix it with perlite, compost, or worm castings depending on what you’re growing. (Exact ratios are covered in the mix guide below.)
Step 5. Fill Your Pot and Plant
Fill your clean container about one-third full with your coco coir blend. Place your plant, fill in around the roots, and firm gently, don’t compact. Coco coir should feel light and airy in the pot, not packed down.
Step 6. Water Thoroughly on First Us
Give the pot a deep initial watering until water runs freely from the drainage holes. This fully settles the medium around the roots and ensures even moisture distribution throughout the pot.
Step 7. Begin a Regular Fertilizing Schedule
Since coco coir has almost no native nutrients, you must start fertilizing within the first week or two of planting. Use a liquid fertilizer formulated for coco coir or a balanced hydroponic nutrient solution. More on this in the fertilizer section.
Step 8. Monitor Watering Frequency
Coco coir dries out faster than heavy potting soil but slower than pure perlite. Stick your finger 1–2 inches into the medium water when it feels almost dry but not bone dry. Overwatering is much less of an issue with coco coir than with regular soil, but it can still happen.
🌿 Pro Tip: For seedlings and cuttings, use pure hydrated coco coir without any added compost or fertilizer at first. Seedlings have delicate roots that can get nutrient burn easily. Start fertilizing only after the first true leaves appear.
Using Coco Coir in Specific Scenarios
| Use Case | Recommended Form | Mix Ratio | Notes |
|---|---|---|---|
| General Indoor Plants | Coco peat blend | 50% coir + 30% perlite + 20% compost | Suits pothos, philodendron, ferns |
| Seed Starting | Fine coco peat | 70% coir + 30% perlite | No compost — too rich for seedlings |
| Orchids | Coco chips | 60% chips + 40% bark | Excellent drainage for epiphytes |
| Succulents & Cacti | Coco peat | 30% coir + 70% perlite/grit | Drainage is priority here |
| Hydroponic Systems | Coco peat + fiber | Used straight or 80/20 with perlite | Use coco-specific nutrients |
| Propagation Cuttings | Coco fiber or peat | Pure coco or 50/50 with perlite | Keep moist, not wet |
How to Hydrate a Coco Coir Brick Correctly
If you’ve ever bought a compressed coco coir brick and stared at it wondering what to do next you’re in good company. Those dense little blocks look nothing like growing medium. But with the right amount of water and a few minutes of patience, they transform into a beautiful, fluffy pile of coir ready for your plants.
“I still remember the first time I tried to hydrate a coco brick by just pouring a cup of water on it and waiting. Nothing happened. I added more. Still barely anything. I had no idea you needed to completely submerge it or that it would expand to nearly ten times its size!”
What You’ll Need
- 1 compressed coco coir brick (typically 650g–1kg)
- A large bucket or tub (at least 5–10 gallons for a standard brick)
- Warm water — 4 to 5 liters per 650g brick as a starting point
- Optional: pH meter or drops to test and adjust water to 6.0–6.5
- Optional: a small amount of Cal-Mag supplement (calcium-magnesium)
Step-by-Step Hydration Process
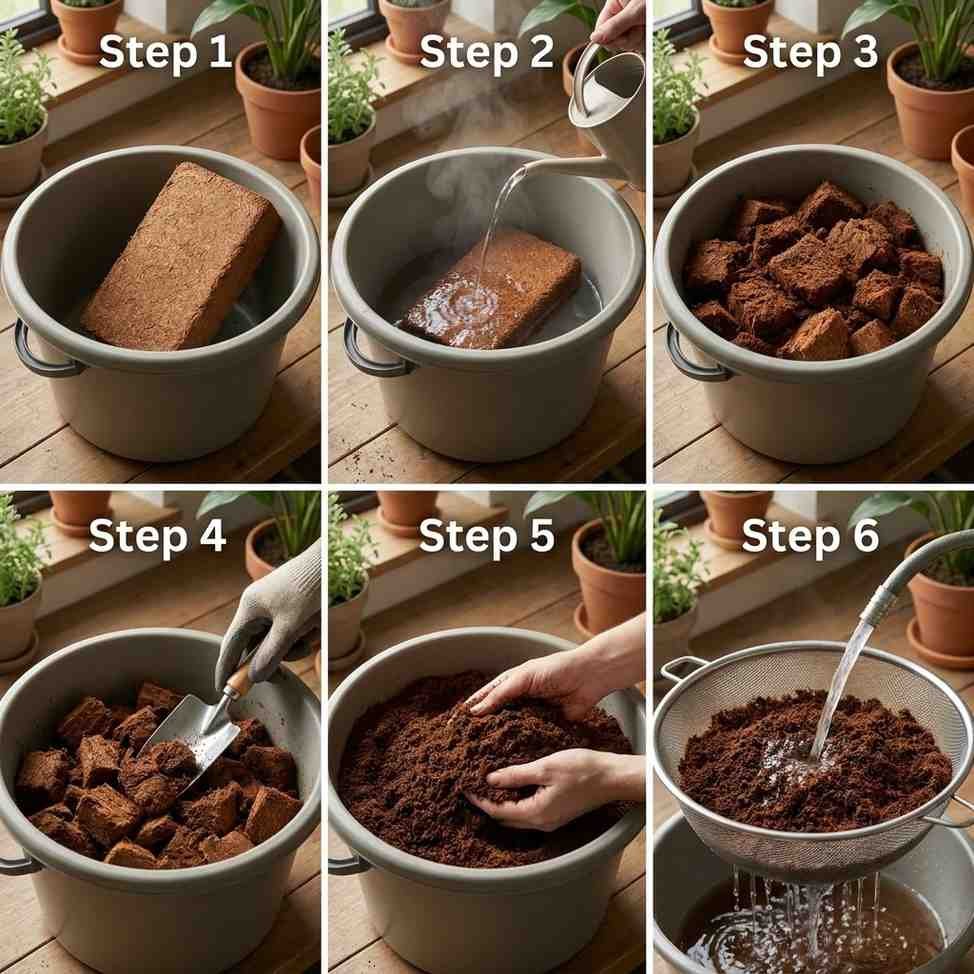
- Place the Brick in Your Bucket
Put the unwrapped brick flat in the center of your bucket. Make sure the bucket is large enough a standard 650g brick expands to fill roughly 8–10 liters of volume when fully hydrated. - Add Warm Water Slowly
Pour warm water (not boiling) directly over the brick about 4 liters to start. Warm water speeds up absorption. Cold water works too, but takes significantly longer. Don’t add all the water at once. - Let It Absorb for 10–15 Minutes
Walk away. Seriously. Give it at least 10 to 15 minutes to fully absorb the first round of water. You’ll see it start to crumble and expand on its own. - Break Apart and Check Moisture
After 15 minutes, use your hands or a trowel to break the block apart. Check if all the coir is hydrated evenly. Dry spots in the center are common add more water as needed and continue breaking it up. - Fluff and Adjust Moisture Level
Once fully broken apart, fluff the coir with your hands. It should feel like damp beach sand or a slightly wrung-out sponge moist throughout, but not dripping wet. If it’s too wet, let it sit open for 30 minutes. If still dry, add water in small amounts. - Optional: Flush Out Excess Salts
For best results, rinse your hydrated coir one time with clean, pH-adjusted water (pH 6.0) and let the excess drain away. This flushes out naturally occurring sodium and potassium salts that can interfere with plant nutrient uptake.
| Brick Size | Water Needed | Final Volume (approx.) | Time to Hydrate |
|---|---|---|---|
| 250g mini brick | 1.5 – 2 liters | ~3–4 liters | 10 minutes |
| 650g standard brick | 4 – 5 liters | ~8–10 liters | 15–20 minutes |
| 1kg large block | 6 – 7 liters | ~12–15 liters | 20–30 minutes |
| 5kg jumbo block | 25 – 30 liters | ~60–70 liters | 30–45 minutes |
Common Hydration Mistake: Adding too little water is the #1 mistake during hydration. If the coir still has a crumbly, dry center after 20 minutes, keep adding water in 500ml increments. Under-hydrated coir will repel water in your pots and create dry pockets around plant roots.
🌿 Product Tip: Popular brands for compressed coco bricks include CANNA Coco Natural, Roots Organics Coco Palms, and Mother Earth Coco + Perlite. If you’re just starting out, the pre-mixed Mother Earth option (70% coco / 30% perlite) is the easiest choice since you skip the mixing step entirely.
Best Coco Coir Mix for Indoor Plants
One of the most common questions from new coco coir users is: “Can I just use it straight out of the bag?” The short answer is you technically can, but you probably shouldn’t. Pure coco coir holds moisture beautifully, but it can become too dense and waterlogged for many plants over time, especially without the right nutrients or additional drainage materials.
The goal of any good coco coir mix is to balance moisture retention, aeration, drainage, and nutrition for the specific plant you’re growing. Here are the best tried-and-tested blends:
The All-Purpose Indoor Plant Mix
This is the mix I reach for most often, and it works beautifully for the vast majority of houseplants including pothos, peace lilies, ferns, philodendrons, and most tropical foliage plants.
- 50% coco coir — provides moisture retention and structure
- 30% perlite — adds drainage and prevents compaction
- 20% worm castings or compost — provides gentle, slow-release nutrition
🌿 Real Example: For a 10-inch pot, combine 5 cups coco coir + 3 cups perlite + 2 cups worm castings. Mix thoroughly before filling the pot. This blend drains excellently while keeping roots moist between waterings.
The Seed Starting Mix
- 70% coco coir: fine, fluffy texture for delicate roots
- 30% perlite: ensures young roots get oxygen
- No compost or fertilizer: seedlings are sensitive to nutrient burn
The Succulent & Cactus Mix
- 20–30% coco coir
- 50% coarse perlite or horticultural grit
- 20–30% coarse sand
This lean, gritty blend mimics the arid, fast-draining conditions that succulents and cacti need. Coco coir is kept minimal here just enough to hold a little moisture without risking root rot.
The Aroid Mix (Monstera, Philodendron, Pothos)
- 40% coco coir
- 30% perlite
- 20% orchid bark (fine grade)
- 10% worm castings
Aroids love chunky, well-aerated mixes that still retain some moisture. The bark chunks create air pockets that mimic the natural conditions of their tropical rainforest habitat.
Coco Coir Mix Comparison Table
| Mix Type | Coco Coir % | Perlite % | Other Components | Best For |
|---|---|---|---|---|
| All-Purpose Indoor | 50% | 30% | 20% worm castings | Pothos, ferns, peace lily |
| Seed Starting | 70% | 30% | None | Seedlings, cuttings |
| Succulent/Cactus | 20–30% | 50% | 20–30% coarse sand | Succulents, cacti, aloe |
| Aroid Mix | 40% | 30% | 20% bark + 10% castings | Monstera, philodendron |
| Hydroponic | 80% | 20% | None (liquid nutrients) | Hydro grows, herbs |
| Orchid Mix | 30% | 10% | 60% orchid bark chips | Phalaenopsis, dendrobium |
“There’s something genuinely satisfying about building your own mix from scratch. Once you do it a few times, you start to develop an intuition for what each plant really needs and your plants absolutely reward you for it.”
Does Coco Coir Need Fertilizer?
Yes and this is probably the single most important thing to understand about growing in coco coir. Unlike regular potting soil (which typically comes pre-loaded with fertilizer that lasts 3–6 months), coco coir is essentially an inert medium.
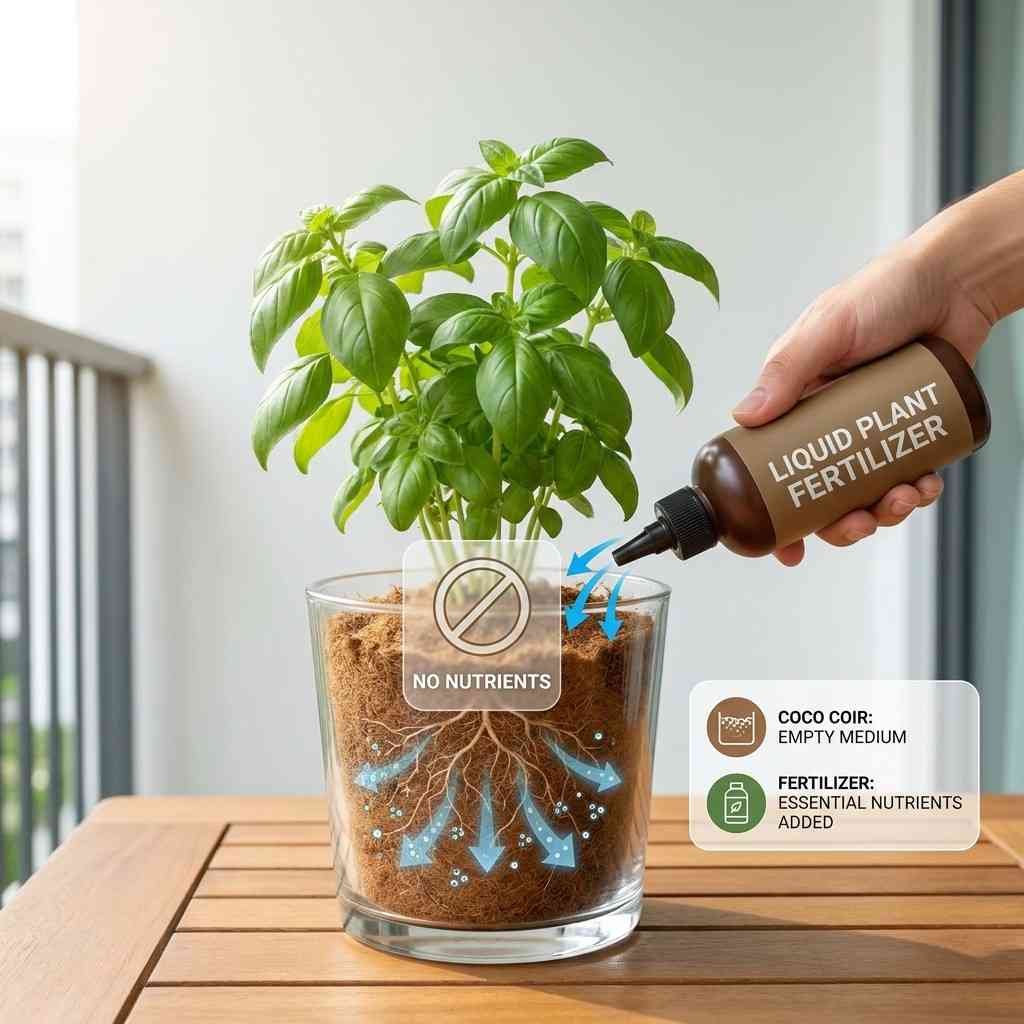
It has virtually no naturally occurring plant nutrients. That means your plants are entirely dependent on you for their nutrition from the very beginning.
This isn’t a disadvantage it’s actually one of coco coir’s strengths. You have complete control over what your plants receive. But it does mean you can’t set-it-and-forget-it like you might with a bag of potting mix.
Why Coco Coir Is Special When It Comes to Nutrients
Coco coir has a natural tendency to hold onto calcium and magnesium ions a characteristic called cation exchange capacity (CEC). In practical terms, this means that coco coir will “grab” the calcium and magnesium from your nutrient solution before your plant roots can access it, especially when the medium is new.
This is why Cal-Mag (calcium-magnesium) supplementation is almost always recommended when growing in coco coir. Without it, plants can show calcium or magnesium deficiency symptoms yellowing leaves, brown leaf edges, or stunted growth even if your fertilizer technically contains those nutrients.
Product Recommendation: For Cal-Mag, General Hydroponics CALiMAGic and Botanicare Cal-Mag Plus are the two most popular and widely trusted options. Use them with every watering at 1–2 ml per liter when starting out in coco.
What Type of Fertilizer to Use with Coco Coir
- Liquid hydroponic nutrients — Fastest uptake, fully water-soluble. Best for experienced growers who want precise control. Examples: General Hydroponics Flora Series, CANNA Coco A&B.
- Coco-specific nutrient formulas — Specially formulated to account for coco’s calcium and magnesium binding. Best for beginners. Example: CANNA Coco Nutrients.
- Worm castings + liquid feed combo — A more organic approach. Add 10–20% worm castings to the mix, then supplement with a liquid organic fertilizer. Works well for low-maintenance indoor plants.
- Slow-release granules — Less ideal for pure coco grows, but can work well when mixed with compost in a blended medium.
Basic Fertilizer Schedule for Coco Coir
| Plant Stage | Fertilizer Strength | Frequency | Cal-Mag Needed? |
|---|---|---|---|
| Seedlings (0–3 weeks) | None or very diluted (¼ strength) | Every 5–7 days | Optional |
| Young plants (1–2 months) | ½ strength liquid feed | Every 3–5 days | Yes — 1 ml/L |
| Established plants | Full strength | Every 2–3 days | Yes — 2 ml/L |
| Flowering / Fruiting | Full strength (bloom formula) | Every 2 days | Yes — 2 ml/L |
Watch Out: If you notice yellowing leaves that start between the leaf veins (interveinal chlorosis), brown crispy leaf tips, or generally pale growth, these are classic signs of calcium or magnesium deficiency in coco coir. Add Cal-Mag to your routine immediately.
pH and Nutrient Solution
Always check and adjust the pH of your nutrient solution before applying it to coco coir. The ideal pH range for coco coir is 5.8 to 6.2 slightly more acidic than typical soil. Outside this range, nutrients become locked out and unavailable to plants even if you’re feeding regularly.

Use a digital pH meter (the Apera PH20 and BlueLab pH Pen are both highly rated) to check your water before every watering session. It takes 30 seconds and makes a big difference in plant health.
Common Mistakes Using Coco Coir for Plants
Even experienced gardeners make mistakes when switching to coco coir for the first time. The medium behaves differently from soil in several important ways, and if you go in with soil-based assumptions, you’ll run into problems fast. Here are the most common mistakes and exactly how to fix them.
Mistake 1: Using Coco Coir Straight Without Amendments: Pure coco coir becomes dense when wet, holds too much moisture, and has zero nutrients. Plants grown in straight coco quickly become deficient and root-bound in a waterlogged medium.
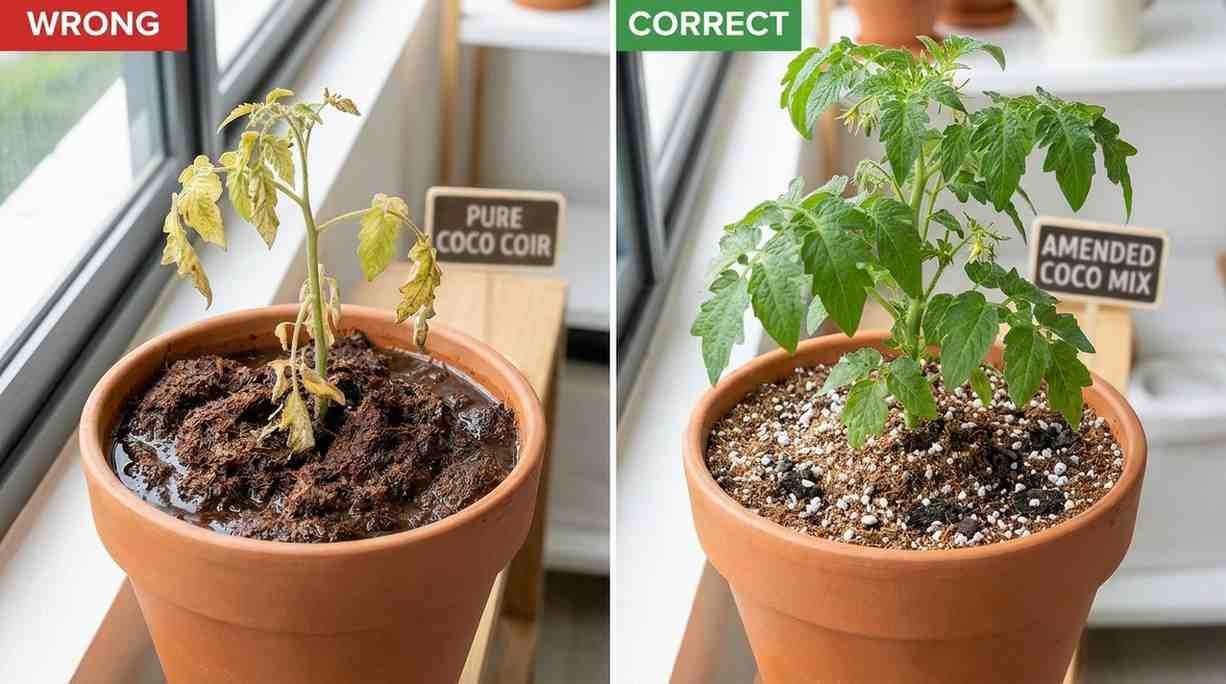
Fix: Always blend with at least 20–30% perlite for drainage. Add worm castings or a slow-release organic fertilizer for nutrition.
Mistake 2: Not Flushing Before Use: Coco coir naturally contains high levels of potassium and sodium from the coconut husk processing. These can compete with and block nutrient uptake especially calcium and magnesium, if not flushed out first.
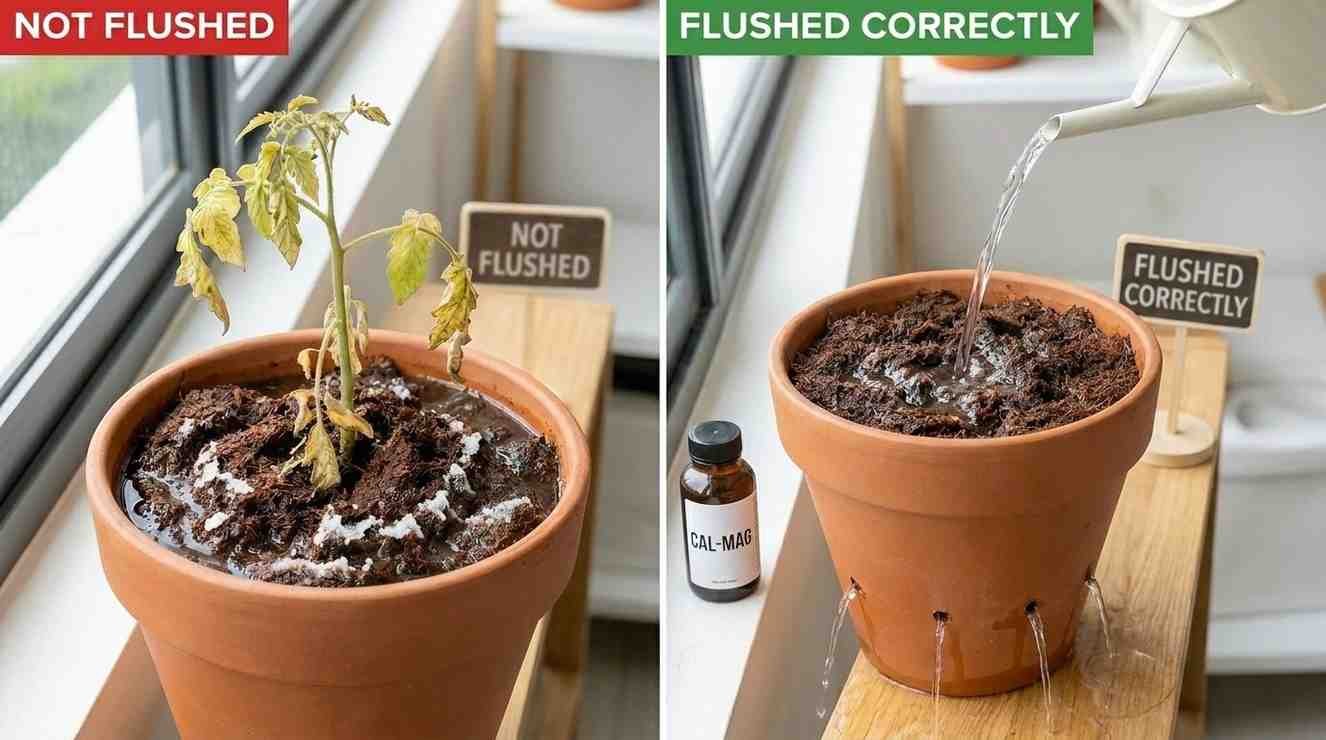
Fix: Before use, flush hydrated coco with clean, pH-adjusted water and let it drain fully. Some growers also add a Cal-Mag pre-soak.
Mistake 3: Forgetting Cal-Mag Supplementation: This is the mistake that trips up almost every beginner. Coco coir’s natural chemistry locks up calcium and magnesium. Without supplementation, plants show deficiency signs within weeks, even if you’re fertilizing regularly.
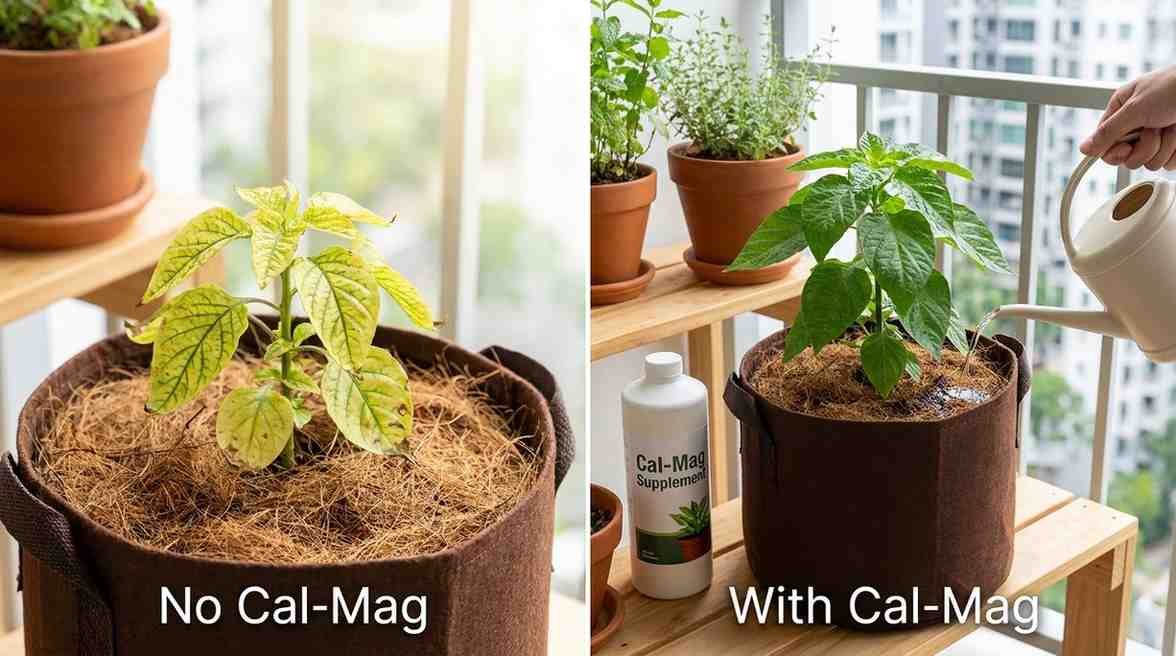
Fix: Add Cal-Mag to every watering at 1–2 ml per liter. Don’t wait for deficiency symptoms to appear prevention is far easier than recovery.
Mistake 4: Watering Like You Would with Soil: Coco coir and soil behave very differently when it comes to moisture. Many gardeners water on a “every 7 days” schedule because that’s what worked with soil. With coco, frequency depends on the plant, pot size, and environment not a fixed schedule.

Fix: Check the medium every 1–2 days by sticking your finger 2 inches in. Water when it’s almost dry but not completely. Smaller pots dry out faster than large ones.
Mistake 5: Ignoring pH Levels: Coco coir requires a specific pH window (5.8–6.2) for optimal nutrient availability. Many gardeners use tap water without checking pH which in many US cities runs between 7.0 and 8.0. That alkalinity can lock out several key nutrients.

Fix: Invest in a digital pH meter. Adjust your water before every feeding. Use pH Down (phosphoric acid solution) to bring tap water into the correct range if needed.
Mistake 6: Never Flushing the Medium During Growth: Over time, salts from fertilizers build up in coco coir. This salt accumulation can raise EC (electrical conductivity) to levels that cause nutrient burn and inhibit water absorption.
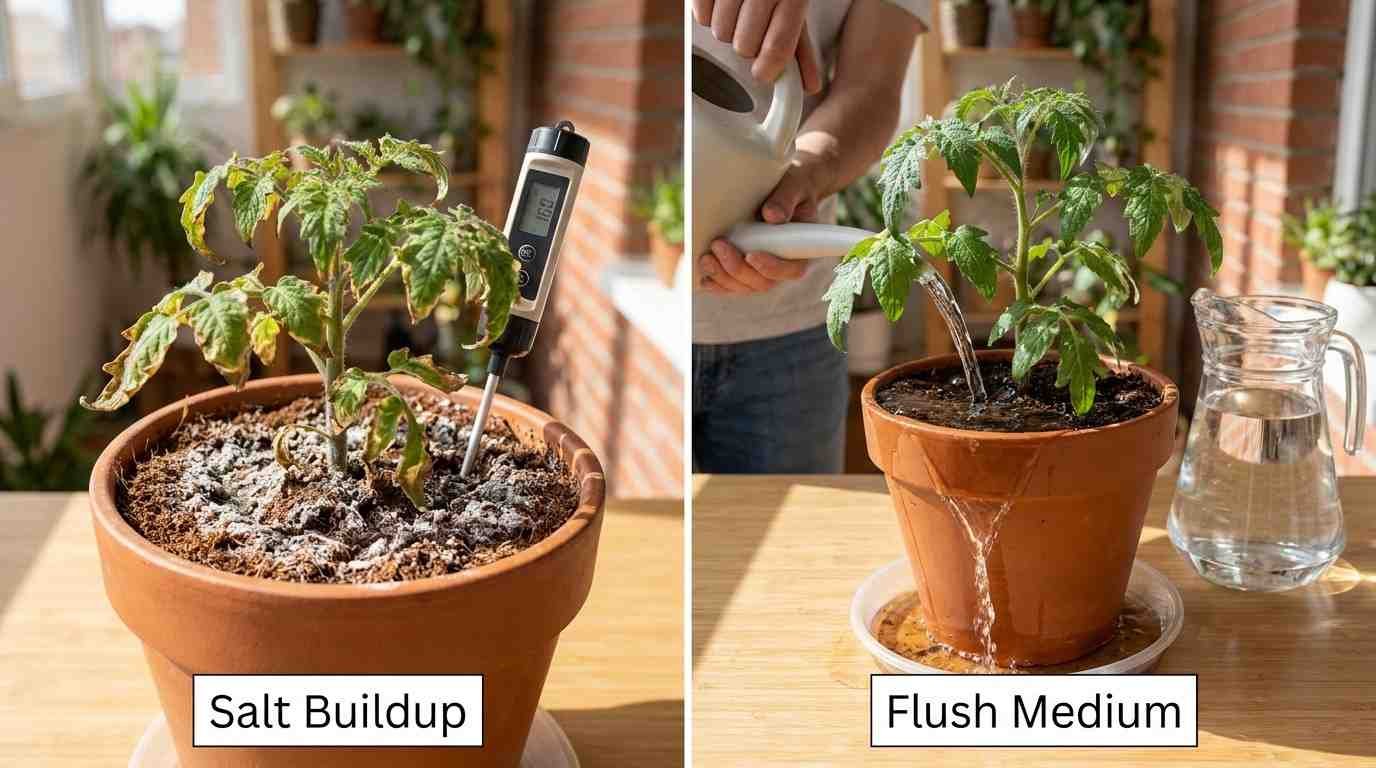
Fix: Every 4–6 weeks, flush your coco coir with plain pH-adjusted water about 2–3 times the pot volume. This resets salt levels and keeps your medium fresh.
Mistake 7: Under-Hydrating the Brick: Many beginners add just a liter or two to a standard brick and assume that’s enough. The result is a coir that’s damp on the outside but bone-dry in the center creating dry pockets in the pot that roots can’t penetrate.
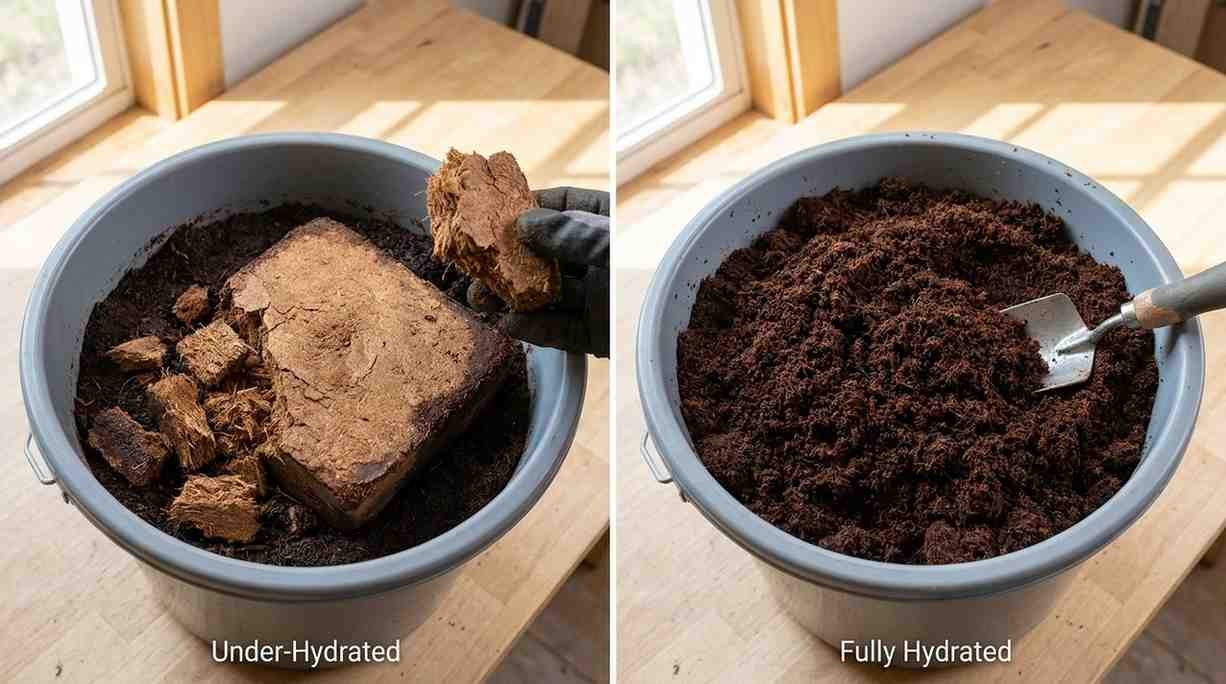
Fix: Use 4–5 liters of water per standard 650g brick. Break it apart completely and check that moisture is even throughout before potting.
Frequently Asked Questions About Coco Coir
Q1. Can I reuse coco coir after a growing season?
Yes, coco coir can be reused. Flush it thoroughly with clean water, let it dry, and store it. Re-hydrate before reuse and replenish nutrients. Most coco coir remains viable for 2–3 growing cycles with proper care.
Q2. Is coco coir good for all types of houseplants?
Coco coir works well for most houseplants, especially when blended correctly. Succulents and cacti need very little coir in their mix. Moisture-loving tropicals like ferns and peace lilies thrive with a higher coir ratio.
Q3. How often should I water plants in coco coir?
Water frequency depends on plant size, pot size, and climate. Check every 1–2 days and water when the top 1–2 inches of coir feels nearly dry. Coco typically needs watering more often than heavy potting soil.
Q4. Does coco coir attract fungus gnats?
Coco coir is far less prone to fungus gnats than peat-heavy soils because it’s sterile and dries out faster on the surface. Letting the top layer dry between waterings makes it nearly inhospitable to gnat larvae.
Q5. What is the pH of coco coir and why does it matter?
Coco coir has a near-neutral pH of 5.8 to 6.8. Staying within this range is essential for plants to absorb nutrients properly. pH levels outside this window cause nutrient lockout even when fertilizer is being applied regularly.
Q6. Can I mix coco coir with regular potting soil?
Yes, mixing 30–40% coco coir into regular potting soil improves its drainage and aeration significantly. It’s an easy way to upgrade standard potting mix without committing to a full coco coir setup right away.
Q7. Is coco coir environmentally friendly compared to peat moss?
Yes — coco coir is a renewable byproduct of coconut processing, making it significantly more sustainable than peat moss, which is harvested from fragile, slow-forming bogs that take thousands of years to regenerate.
Conclusion: Your Plants Deserve Better Than Basic Soil
Coco coir isn’t just a soil alternative — it’s a genuine upgrade for almost any plant you’re growing indoors. It gives roots the perfect balance of moisture and oxygen, it’s sustainable, reusable, and when combined with the right mix and a consistent fertilizing routine, it produces healthier, more vigorous plants than most traditional potting mixes.
The learning curve is real but short. Master the hydration process, build the right blend for your plants, don’t skip the Cal-Mag, and keep an eye on your pH and you’ll be wondering why you didn’t make the switch sooner.
Happy growing.